Showing posts with label clay animals. Show all posts

Wednesday, April 13, 2016

In the Art Room: My Favorite Clay Lessons

Well, y'all, I gotta tell ya. It's been a long, exhausting but super fun and exhilarating week. Which can only mean one thing: Clay Week! I started doing a week of clay for the entire school a coupla years ago and now that we have it all down pat, we ain't never going back. The only thing I plan to change for next year: do two separate clay weeks, one in the fall and one in the spring. The kids love clay so stinkin' much that I want to give them more opportunities to explore! 

I spent this past weekend filming clay demo videos that I've been sharing with each of my classes. I did this for a couple of reasons: 1. it's so hard to demo clay and insure that each child can see. 2. I don't forget any of the details or get distracted by raised hands, talker-outers or whatever randomness that causes me to get off track and 3. the kids pay so much more attention to Television Stephens than Fur Realzies Stephens (which I take offense to but whateves). I've not added these videos to my YouTube channel yet because I'm too tired, y'all! Instead I thought I'd share with you my favorite clay lessons (with links to each lesson!) of all timez.

IN OTHER NEWS (by the way, if you know me even for a second, you know that "in other news" is my fave segue to totes off-topic-town), I've been keeping secrets from y'all. It's time I let the big ole cat outta the bag: I've been working with Quarry Books...and I'm writing a book! That's right! AND it's all about...clay! So...in case you noticed that the DIY's on this here blog have pretty much dried up to nothing that's because my weekends have been spent working on el book-o. I've been keeping it kinda on the down low because I didn't want to get too excited lest Quarry find out what a crazy I am and back outta the deal. But it would appear that they are in it to win it and so am I. I'll keep y'all posted...but I just had to share. 

AND NOW, back to my fave clay projects!
When it comes to Clay Week, I do love to have a theme. This helps with the teaching as I can reference the same visuals. It also helps when we put together the art show as there is a real cohesiveness to it all. The clay display is always in my art room. It looks so nice to see all of these thematic projects together! One of my favorite lessons for an Asian theme were these Painted Indian Elephants inspired by my art teacherin' buddy Debbie Flynt. Each one was so colorful and unique!
Another hit, especially with the kids, were these Chinese Dragons by my third grade students! So much creativity and imagination went into each and every one that this was def a kid fave. 
Pandas are so stinkin' cute. We've taken to watching Animal Planet's Panda Cam in my art room (along with puppy, kitten and otter cam...y'all, it's seriously the best thing ever). My fourth graders had a blast making these Pandas with Personality for our Asian theme. 
Because our art show is in the spring, I settled upon spring with an emphasis on Monet's Waterlilies one year! My fourth graders created these frogs with so much spunk and personality that they really were a true reflection of the young artist! 
Kindergarteners are a freakin' joy to do clay with as they absolutely love every minute of it! While we were working today, I heard so much laughter, happiness and discovery that it just made my day. We created these textured butterfly wallhangings to go along with our spring theme. 
Opening my kiln to these pretties, I remember letting out a squeal! They were so colorful and spring-like and the third grade had a blast making them. 
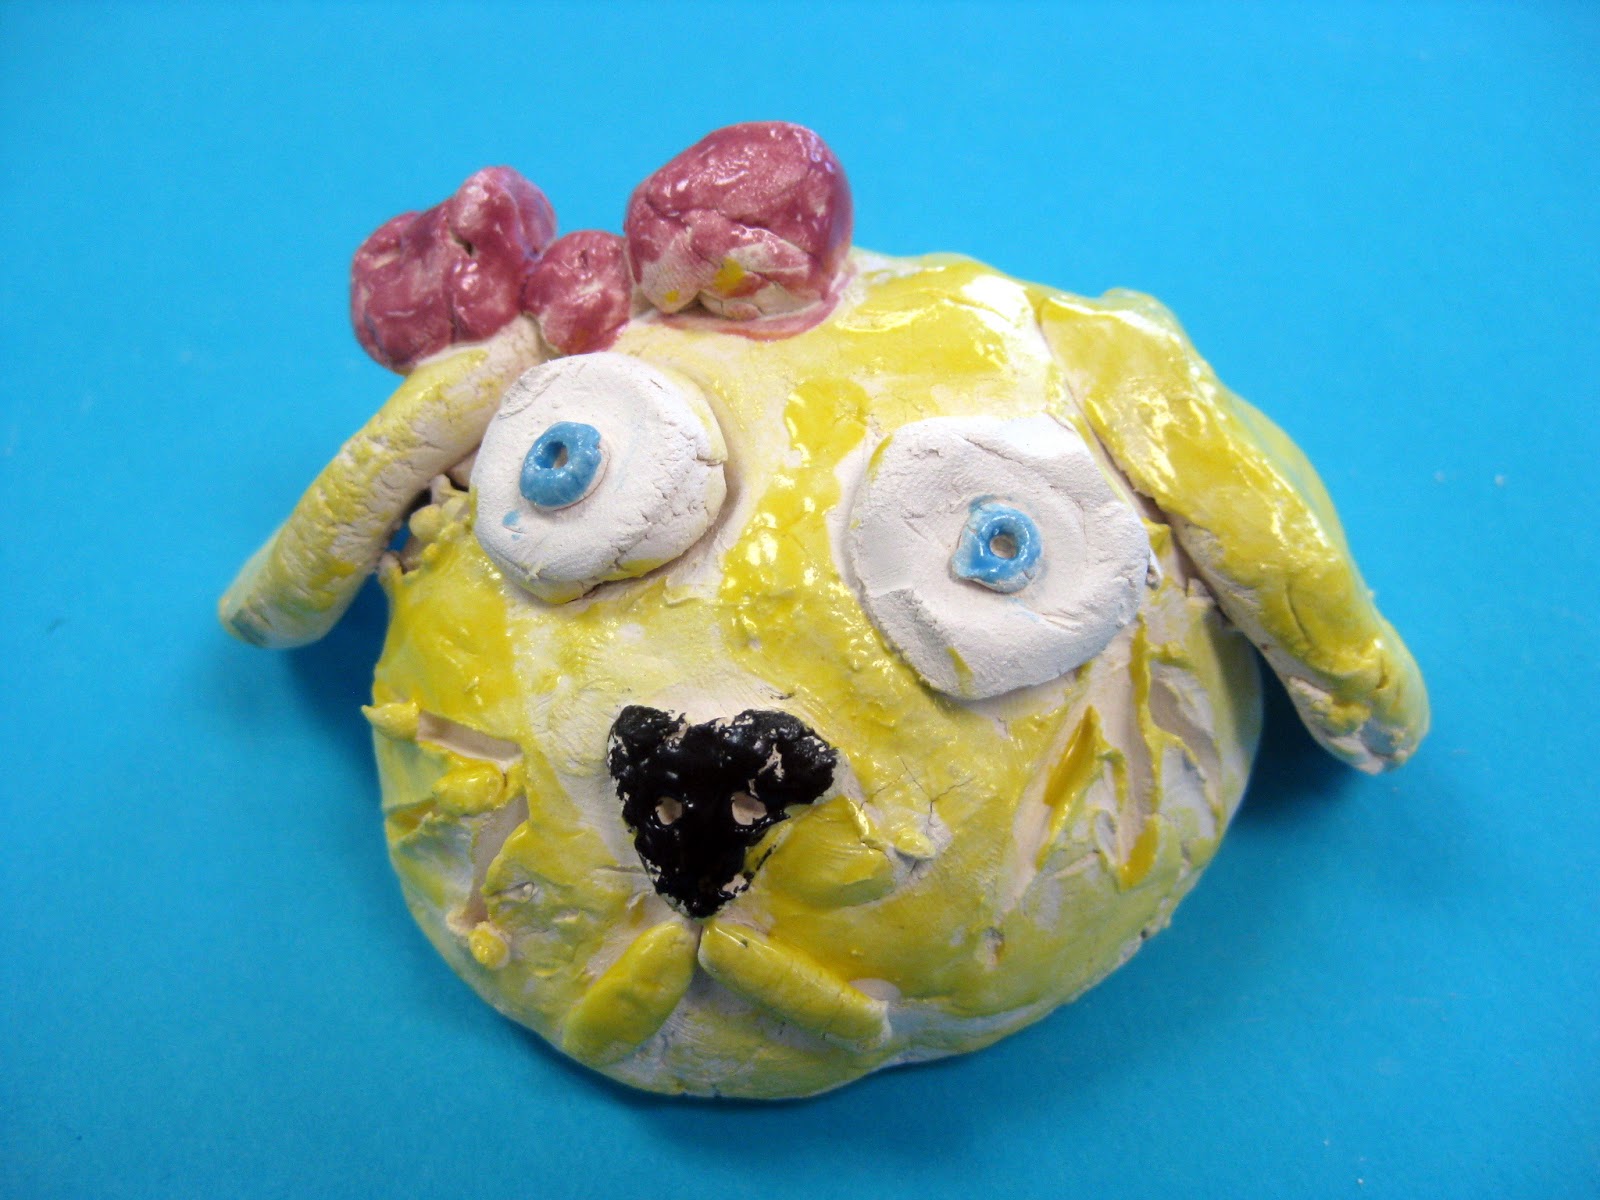
My favorite projects are the ones where the kids just go bananas with little details and creativity. That's what my second graders did with these cute and fun waterlilies.
One year, our theme was animals because we "sold" our creations back to our parents (for a donation) which we turned over to a no-kill humane society. This was a fun experience for the kids to see the power of being kind and art! My kindergarten and first graders created these sweet Pinch Pot Pets
My second graders used two pinch pots to create their own version of Pinch Pot(s) Pets! I love all the variety of ideas in this lesson. 
My fourth graders created these fun cat and dog sculptures. I love to encourage silliness and imagination in their works so that they really explore making a simple idea like a cat or dog their own. Again, this was a hit with kids and parents! 
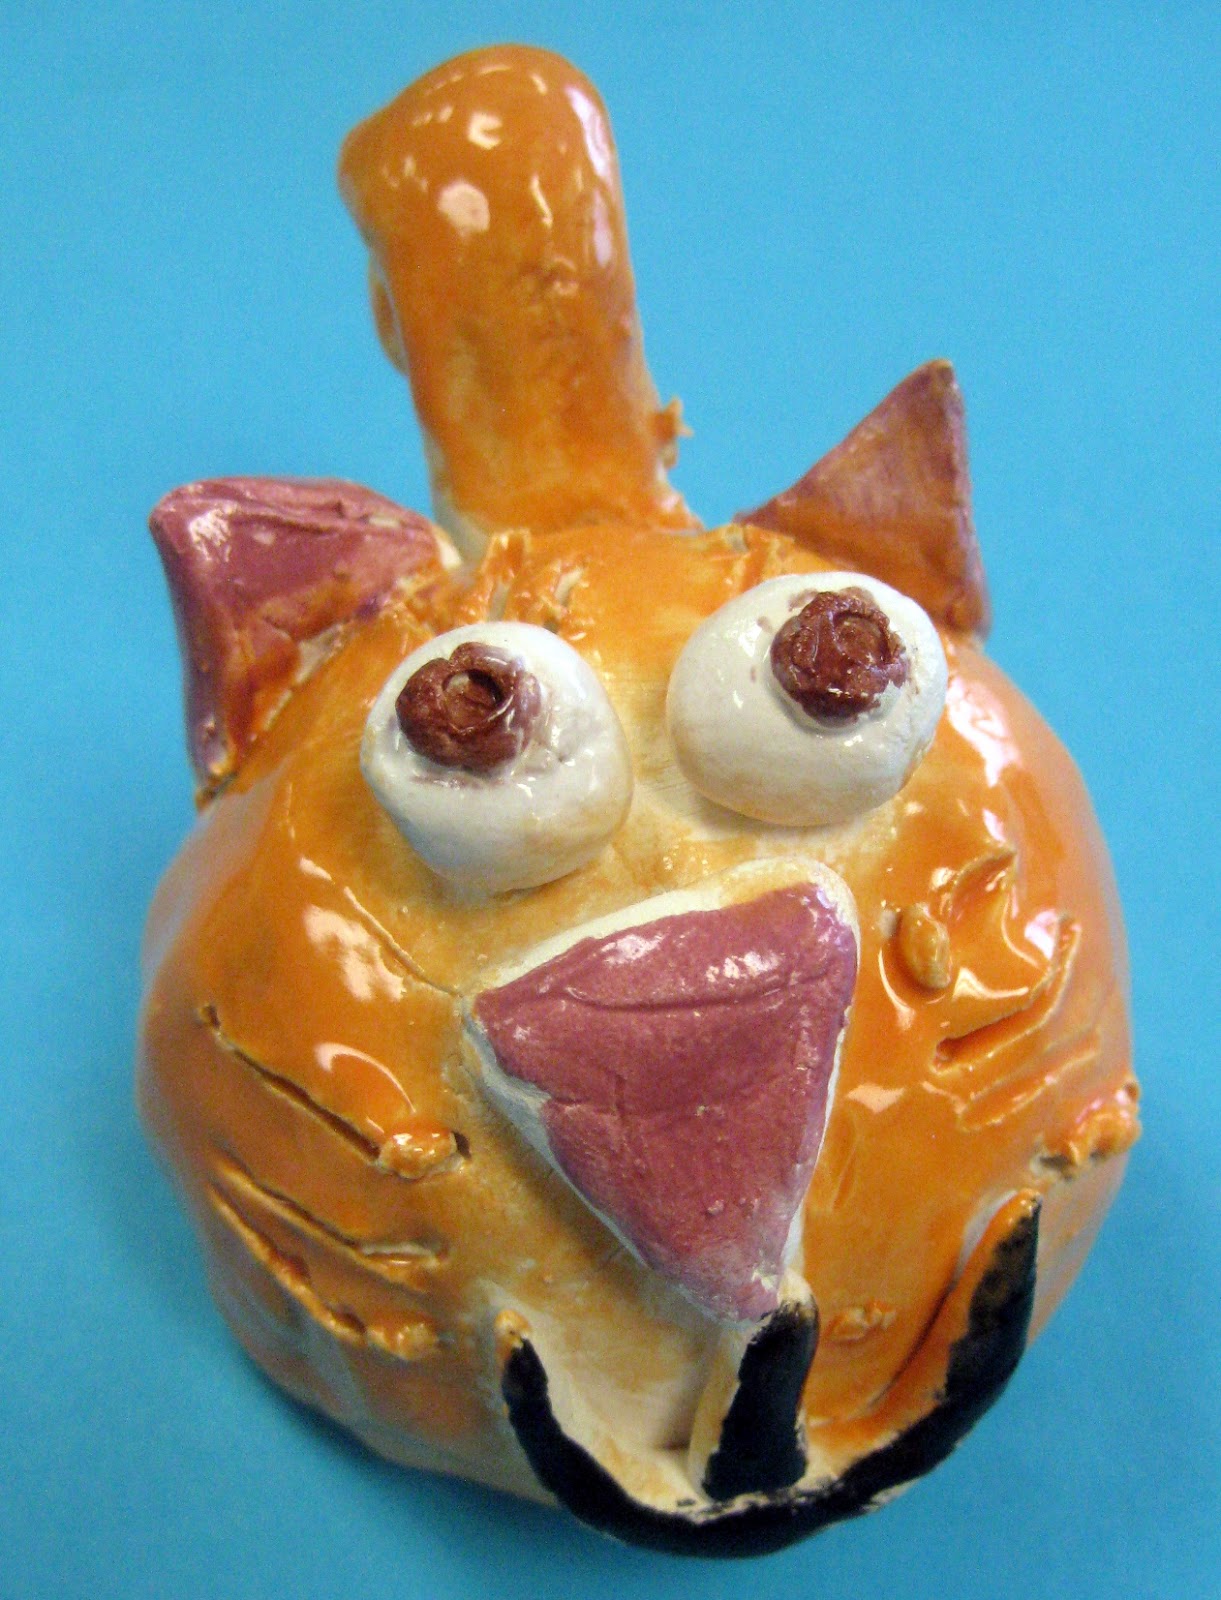
Second grade created these tigers one year that double as a container. There's a pinch pot on the back of each tiger that was flipped upright to be used as a bowl! Our mascot is the tiger so this was a great tie-in with school pride as well as keeping with our animal-loving theme. 
And now for a batch of randoms. These fish were not tied to a theme but super cute. I love that clay can be a great vehicle in teaching texture. Such was really emphasized in this textured fish lesson for first grade!
Wall hangings can be a fun alternative to sculpture when working with clay. It's often difficult for the young kids like kindergarten town to create standing sculptures. So, with a focus on texture, my wee ones last year created these textured birds! This blog post has a how to video if you are interested.  
This is one of my tried and true favorite lessons that I used to do every year with second grade until I grew tired of it and moved on. I brought it back for an after school group last year and they loved their textured initial wall hanging!

What are some of your fave clay lessons? I am SO EXCITED about our clay theme this year and cannot wait to share it with you...it's gonna be the best one yet!
 photo signature_zpsd10b3273.png
Read more »

Monday, June 3, 2013

In the Art Room: Pinch Pot Pets Take 2

Sometimes giving the kids the choice of every color glaze in the rainbow can be a dangerous thing. But I happen to think this turquoise with white spots pup is just the cutest.
If you are a teacher, then you are currently in one of two places: Summer Vacation Bliss or On the Verge of Summer Vacation Madness. I'm the former but I can totally empathize with all ya'll in the latter. The last week of school followed our school-wide art show which left my art room as cleared out and empty as my brain. But have no fear, all you O.V.S.V.M. folk! The end will come (of the school year, not the end of time. I'm an art teacher not an evangelist) and soon you'll be like me: feet up, taking in the sunshine with a nice tall cold...um...tea (well, perhaps a splash of tea along with some other happiness-inducing ingredients) and frantically brainstorming lesson plans and thematic ideas for next year. Ah, the joys of being a teacher. Which sometimes feels like that unwanted gift that keeps on giving. Like a Chia Pet. Or crabs. 

(Did I really just liken my job to an STD? I believe I did.)

Don't get me wrong: if I didn't love what I do, I wouldn't spend so much time plotting and planning. Which brings me to this lesson. I started the planning stages of this project about this time last year. If you've read my recent art project posts (you haven't?! What's wrong with you, you got a life or something? No you don't, go read here and here.) then you know our purpose behind these animal sculptures: to raise money for a local humane society. Each grade level sculpted a dog or cat sculpture (check out my kindergartener's work and my fourth grader's masterpieces) with these being the ones my awesome second graders created.
The problem with projectile whiskers is sometimes they break. I still love this green-eyed spotted kitty just the same.
Because I'm missing school just a pinch (yeah, I do believe there was a little too much happiness in that last cup as well), let me geek out on you and break this lesson down with some good ole bullet points: 
  • On our first day, the kids were given a piece of clay the size of an orange. They twisted this piece in half and created a pinch pot with each piece. 
  • To connect the pots and create a sphere, each kid was given a small piece of newspaper (pages from the phone book work great...why am I still getting those, btw?). This was crumpled up and placed inside the pinch pots to prevent them from flattening. In the past, we've rolled up small spheres of clay and placed those in the newspaper before sealing it inside. When the newspaper burns, those little clay beads create a rattle inside of your piece.
  • After the newspaper was placed inside the two pots, the sphere was complete. To reinforce the seam where the two pots came together, the kids rolled a coil of clay and placed it over the seam. This was flattened and smoothed. I know what you're thinking, "An enclosed piece of clay is going to explode in the kiln!" Dude, relax, I got this. Holes were pierced into the sphere at a later stage.
  • Because my classes are a half and hour long, it was at this point that the kids wrapped their spheres in a wet paper towel and sealed them inside their labeled ziplock bag.
  • On the following day, the kids rolled out and attached four thick and short coils of clay for legs. To prevent the legs from falling off once attached, we bent the end of each leg at the top. This created a larger flat surface for the leg to attach to the bottom of the sphere. Of course, we tooth brushed the bottom of the sphere and the tops of the legs before attaching.
  • The kids were given some ideas on how to create a face for their pet. Then they came up with a billion much better ideas. Which is how is always goes, isn't it? I cannot keep up with their superior imaginations.
Best. Ears. Ever.
  • Now, I gotta tell you two quandaries I found myself in with this here project: One was finding a place to write the student's names. Ultimately most ended up being emblazoned on the tooshie. And the other quandary was that we did have a couple explosions in the kiln. Because all of the pieces were given a "belly button" (a small hole with a skewer stick in the bottom of the piece) I can only imagine that the explosions were caused by the thickness of the clay. The two kids handled it quite well, knowing that they'd be able to create a new piece. Apparently, it's very cool in secondgradeland to be able to tell your buddies "my dog blew up the kiln". 
  • Once the pieces were returned to the kids, we set to glazing. I love Mayco's Stroke and Coat as do the kids. We chatted about the patterns that might appear on dogs and cats, real or imaginary. 
And there you have it! I've still no idea just what we'll be up to this summer...but I've got a couple crazy ideas rolling around. Until next time, have a great Monday!
Read more »

Wednesday, May 15, 2013

In the Art Room: Cats and Dogs

This sculpture just makes me wanna say, "Aw, who's a good boy?! Are you a good boy? Oh, yes you are!" in my most annoying talking-to-doggies voice.
Hi there. Remember me? I'm that blogger that used to post a weekly DIY. That was before the school-wide art show ate my life. Thankfully, almost everything is hung up and on display and ready for the big day tomorrow. And, since I'm blabbering about the art show (of which I will most definitely snap endless photos and share them here), I'd like to give a super huge cyber hug to all the amazing moms that help out in the art room. Seriously. They've hung 5 pieces of art for each of my 400 students. I don't like math, but I'm no dummy. I know that's a whole lotta artwork.
This is like one of those super cute kitties that the moment you turn your back on them they hiss at you, claw your legs and hack up a hairball in your purse. When you turn back around...all you see is this creepily sweet face. Shivers.
Since my life has been swallowed by art-showy-ness, I thought I'd give you a sneak peak at my fourth graders clay projects. You might remember from this post that my students have created dog and cat sculptures this year. This was apart of our art service project as donations will be collected on the night of the art show for these sculptures and the proceeds will be going to Happy Tales Humane.
Your typical dog and cat: Dog does goofy stuff. Cat looks on in disgust.
In years past, my students have participated in Empty Bowls, a wonderful using-art-to-give-back opportunity. I'm trying to instill in these little art students of mine just how powerful and helpful their work can be.
Someone please play fetch with this sweet little pup.
Now each one of my grade levels did a different version of an animal sculpture and I've gotta admit, I liked these the best. Each of my fourth grade students had such great ideas that it really was exciting to watch and teach. I just taught them the basics and they went from there. If you are interested, here's what I showed 'em:
  • To begin, chose a texture for your base. I've got a wide assortment of doilies, burlap and textured surfaces for them to use. Fabric works best for this as it won't stick to the clay. 
  • Position your grapefruit-sized piece of clay on your texture. Using the bottom of your fist, pound the clay into the texture until it has a thickness of a cookie.
  • Peal your clay from your texture and prepare to be amazed. Move your texture off of your surface and cut out a shape for your base. To save time, I give my students several base shapes to chose from: circles, rounded squares and a floral kind of shape.
  • With the excess clay, roll out four legs. I tell the kids these should be as long as their finger but twice as thick. Because my classes are a half an hour long, this is usually where we stop for the day. The clay is wrapped in a damp paper towel and placed inside a ziplock back with the child's name on the front.
  • The following art class, the students create a body with a thick piece of clay. The legs are attached by using a little water and some scrubbing with a toothbrush.
  • To make the face, I tell the kids to sink both of their thumbs into an oval shaped piece of clay. This becomes the eye sockets.
  • The mouth is created with a skewer stick wiggled into the clay horizontally.
  • The nose is pulled upward away from the clay.

  • Eyes are rolled from two spheres and pupils are given with the back of the skewer stick. Here's my rough and dirty example. I've found that by making my example far from perfect, it removes they "I could never do that!" idea. 
  • Now, like I said, that's the basics. What I really wanted to emphasize to the kids is that they are unique artists so their work should reflect that. I wanted them to really explore all sorts of different ideas. So that they could make their ideas come to life, I told them that anything can be created out of clay by using three things: spheres, slabs and coils. I asked them to give me some ideas on what they'd like to make so see if  my theory was true. They told me: frisbee? Sure, a slab. A dog bone? A coil. A sombrero (yes, there's a dog with a sombrero and a mustache)? Let's see, a slab and a sphere. Coil for the 'stache.
I love the windblown ears.

This beagle was created to look just like the artists own. I love the cat on the right. Notice the palette and paint brush in her tiny paws.

The texture on this dog is awesome but my favorite part are the crossed paws.
This student meticulously glazed the rug on which her cat sits...and it's stunning. I love all of the depth and texture in her piece.
Isn't this how every cat sees himself? Royalty. Or a royal pain. You decide.
When it came time for glazing, these kids were so invested in their masterpiece that they spent an entire hour glazing. I love the effect of Mayco's Stroke and Coat. But mostly I just love these creations. I cannot wait to see their parents reaction tomorrow night at the art show. Until I recover from that, enjoy the rest of your week!
Read more »

Wednesday, April 17, 2013

In the Art Room: Pinch Pot Pets

Every time I go into the kiln room and see these little guys staring at me from the shelves, I feel like singing: I always feel like...Somebody's watching me. And I have no privacy, Whooooa, oh-oh (go get you some Rockwell here and be prepared to get your paranoid on).
Greetings from the land of Pinch Pot Pets! Last week my younger students completed glazing their clay animals (my older students are still painstakingly working on every minute detail of theirs) and I'm excited about the results. Our theme for this year's clay projects were cats and dogs as our students will be "selling" their work back to their parents for a donation to the local humane society. We're do-gooders like that. The kids love clay and really enjoyed this project. But I'm rambling. Check out this cuteness:
Aw! This looks like a certain orange cat that lives in my house! I wonder if this one plants herself on the table at dinnertime as well.
"Hmmm? Did someone say snack?!" I love the added detail of the collar and hair bow by this first grade student.
So just how did my wee ones complete these clay projects in half an hour art classes, you ask? Well, it wasn't easy. But I've found that breaking the clay construction up into two days helps. And having several parent volunteers on hand. Mostly to keep me in line.

In preparation, here's what's on each table:
  • a clay mat for each child, purchased from The Clay Lady
  • 2 cups of water and 2 toothbrushes
  • 4 skewer sticks
  • 1 piece of clay the size of a small orange per student
Other preparation included:
  • One labeled ziplock bag per student
  • a damp paper towel per student
 For the demonstration, I have the students gather around a table and I show them the steps to creating a pinch pot. Here's what I tell 'em:
  • Roll your clay into a sphere and place it into the palm of your hand.
  • Using your other hand, put your thumb on the top of the sphere and wrap your fingers around the back.
  • Sink your thumb so deep into the clay that it looks like your thumb is wearing a clay afro. But don't go too deep and have your thumb pop out the other end because then you'll end up with a donut. And nobody likes clay donuts.
  • That part they can do no problem. Thumb afros, they got that. It's the pinching-into-a-pot part that some struggle with. I ask them to imagine they are holding a cookie and show me what that would look like. They all hold up their fingers about 1/2" apart. I tell them that their clay should have that same thickness. And then we eat the imaginary cookie with a loud "crunch!" and "mmm!" before proceeding.

  • After showing them a couple of non-examples of pots that are too thick or thin, I show them what a correctly pinched pot should look like. 
  • At this point, the demo is over. I show the kids how to wrap their pot gently in a damp paper towel and place it carefully into the ziplock bag. They are not to seal the bag closed as trapped air inside will dry out the clay. Instead we simply tuck the bag underneath the pot. Like this, their project will stay damp for up to a week. But it might begin to smell a bit if kept longer.
  • The following art class, I tell the kids that they may either create a dog or a cat. I introduce them to the idea that you can make anything out of clay with three things: a sphere, a slab and/or a coil. To illustrate that, I begin by using spheres for the eyes. 
  • Note: all pieces of clay must be attached by using the toothbrush and cup of water. I tell the kids, if you don't brush your teeth, your teeth fall out. If you don't brush your clay, your parts will fall off. It kinda works.
  • I demonstrate using the stick to add the pupils and eyelashes.
  • A sphere pinched into a triangle is used for the nose.
  • Coils for the mouth and skewer-drawn whiskers.
  • I tell the kids that the parts of a face for a dog and cat are about the same. It's the ears that make the difference. Using a slab, or flattened piece of clay, the kids can create dog ears. Cat ears can be created by cutting the slab into a triangle shape.
  • Some finished theirs off with a coil for a tail. 
  • And that concludes the second day of Pinch Pot Pets! As the students finish, the volunteers and I wrote their names and teacher codes on the inside of the pot. Then I set them out over Spring Break to dry completely.
After Spring Break and many firings, their bisque-fired clay animals were ready for glaze. I like to use Mayco's Stroke and Coat. I gave the kids every color in the rainbow (which many saw as an opportunity to go hog wild) and told them my two glazing rules: don't glaze the bottom as the glaze will cause the project to stick to the kiln shelf; don't layer 15 different colors of glaze on top of each other. Because it will look like a rainbow exploded in a really bad way. However, if you want color, do it with patterns.
And suddenly I feel like I'm in San Francisco all over again. Super psychedelic, dude.
These two crack me up. The Eye-Popper-Outter and the Cheshire Cat.

Stripes and spots were a pretty big hit.

And there you have it! Pinch Pot Pets. If you'd like to see what my students created last year out of clay, you can visit here. Be on the look out for more clay posts within the next couple weeks as the kiln just keeps spittin' out these awesome little masterpieces. Until then, enjoy the rest of your week!


Read more »