The other day, I was perusing the isles of my local big box craft store with the previous night's Art Teacherin' Book Club on my mind. We were joined by the amazing Barney Saltzberg, author of Beautiful Oops (among 62 other titles!) You can still view his live chat here. He said some things that really stayed with me: "You need to build your imagination muscle. Don't look for ideas, they are already there!" He shared with us that "art finds him" and that he has built his imagination muscle up so much that he can see what most people fail to.
With those words ringing in my years, I stopped in my tracks when I spotted these oars on the Wooden-Thingies-You-Can-Paint isle (actual isle name). I was like, "Big Box Craft Store, you say Oar, I say Paint Brush Decor!" And marched outta there with a cart full o' oars faster than you can say, "take my fistful of coupons and can I score that teacher discount, please?!"
Now just HOW I was gonna paint them was still yet to be determined. In fact, my first attempt was what I'd like to call shabby sh** (just a step above shabby chic). Then I remembered Lichtenstein's painting Brushstroke. And I was totally inspired.
So I went the cartoon-style route. It really made the painting process so much easier. Lay down flat areas of color, allow to dry and then add the high- and low-lights using black and white.
Once I had these bad boys in my cart, I was so excited to see more inspiration in the mundane. Before I knew it, I had my cart full of Wooden-Thingies-You-Can-Paint...but decided to return them to their shelves for another day. One project at a time, right? My hoarders-therapist (aka the hubs) woulda been so proud.
Now, I will admit, when I got them home, and these oars looked every bit like an oar, I was fearful I wouldn't be able to pull this off. Then I happened to look at the paint brushes I'd been using and realized that they had the long handled look as well. With a little skillful painting, I might be able to transform them.
My name is Cassie Stephens. I used to suffer from Painting-Dysfunction. Every time I approached a surface for painting, I would convince myself that I would create a complete mess. It was not until I discovered alcohol relaxed and realized that I could always just paint over it, that I was able to paint with ease. Now I have no problem consuming alcohol enjoying the process and painting without worry. It's just a canvas or a Wooden-Thingie-You-Can-Paint, after all! Don't like it? Paint over it!
Blah, blah, blah, here I am doing the boring part of laying down the color.
By the time I'd finished painting the paint portion of the brush, the handle was dry enough for me to add the white and black accents. They have a British and French accent, by the way, respectively.
Ta-dah! I am really so stoked about these, y'all don't even know. I'm excited to paint the secondary colors and hang them as a color wheel in my art room...stay tuned!
Did I mention I was stoked? I'm a little stoked.
Now that these guys are finished, I'll have to stroll down that Wooden-Thingies (ahem) isle once more. Thank you, Barney, for the inspiration. See art. Look for it. It's everywhere, y'all!
Last year, I started a series of videos titled Field Trip! The purpose of these videos was to take all of my students on a virtual adventure to meet contemporary artists, see their creative spaces and witness them creating. You can check out my playlist of Field Trip! videos here. If you subscribe, you can also stay up-to-date as to when I post a video. I actually have three more Field Trip! videos recorded that I need to edit and upload before sharing them with you and my students. Please feel free to use these (and any of my videos) in your art room...I think all students can benefit from learning about these unique, creative and current working artists. I admit, I fell off the wagon HARD last spring when it came to searching out artists, contacting them and filming them. I was starting to feel super overwhelmed with all things art teacherin': the national conference where I presented a couple of times; our school-wide art show which is a beast of an undertaking and our clay unit which we always kick off in the spring. I will also admit this to you...I am very lazy, not consistent, a procrastinator and, did I mention lazy? I'm lazy. One look at Mount Laundry and you would agree. But knowing just how much my students benefited from these videos, I knew I had to continue creating them. So during the spring, I attended an artisan fair and picked up just about every business card that I saw sitting out. Once home, I researched the artist, looked into their location (Nashville and just a little beyond is ideal) and sent them an email. I got a great response...artists are so giving with their time and willingness to share! The first artist I scheduled to visit is the one and only Audry Deal-McEver.
Look at her beautiful home! Audry's studio is right behind her home and it is absolutely stunning, check it out:
When I arrived at Audry's home, she reminded me that we actually met many years ago (we are thinking about 10-12). My brother, who is 10 years my junior, was in a very bad car accident and was in a coma for several weeks. During that time, my administration allowed me to be with him and my family. Audry's mom, an art teacher, stepped in for me. She taught my classes, kept the students creating and made it so I could focus on what was most important. Her daughter, Audry, came in one day and did a wheel throwing demonstration for the students. I still have the photos of that day and share them with the kids when we chat about clay. What a crazy turn of events, right? My brother, by the way, pulled out of the a coma that they said he would not and is now an English teacher on a Native American reservation.
I'm rambling...here's the video!
I have to tell you...Audry is an INCREDIBLE teacher...because she IS a teacher. She's taught ceramics and photography for the past five years at a local school. She is now taking time off from teaching to focus on her work. However, she does such a wonderful job explaining every element of working with clay that I feel this video would benefit all students, upper elementary on up to college.
At the start of the video, you'll find her wedging clay. She explains the reasoning behind that and how to do it. Then she moves on to throwing on the wheel...which she makes look incredibly simple. I could only dream to throw a pot on the wheel that didn't end up looking like Patrick from SpongeBob Square Pantalones.
I love how Audry shares her inspiration...and the origin of paisley! I had to include that in the video, it was new to me. Also, watching an artist work is always hypnotizing and she does her clay carving so quickly. It was fun to watch.
I was thrilled when she explained how a kiln works and the different types of kilns. I know that can help even us art teachers who might not understand how to operate a kiln.
Audry mixes up her own glazes to create the desired color. Her application process was interesting to see.
And I loved the results so much, I had to have one of her vases in my home. She also gave me a beautiful mug...I know the kids will love to see me gettin' my coffee on with one of her pieces.
A big THANK YOU! to Audry for allowing me to visit. Be sure to follow her Instagram as she shares videos and photos of her process.
I hope you enjoyed this visit to Audry's studio as much as I did! Until next time...
Did your little art teacherin' heart just flutter in your chest?! MINE TOO! You guyz, I'm so excited that the one and only, everyone's favorite, one-heck-of-a-guy, book author Barney Saltzberg will be joining us for our Art Teacherin' Book Club this Wednesday night right here. If you have been apart of our book club, then you know we've been reading The Growth Mindset Coach and loving it.
Last week we were so fortunate to be joined by co-author of the book Annie Brock. If you were apart of that chat, I think you will agree that Annie was AMAZING, INSPIRATIONAL AND ALL THINGS CAPITAL LETTERS. If you missed out on the live chat, no worries, you can still find our discussion here. Those of you who joined in, I promise that a blog post with all the links, books, videos and more that Annie mentioned is to come.
Every week, when we discuss growth mindsets and resources that can help us introduce this concept to our students, we always bring up the book Beautiful Oops. It so wonderfully shares that what we deem mistakes can actually become something more magical than anything we could have ever imagined. I think this is one book that every art teacher should have in their art room if they don't already. I also think it is a perfect way to explain how to keep a growth, and not a fixed, mindset in place.
With that in mind, I decided to reach out to my friend Barney. I was connected with Barney many moons ago via a mutual friend. Since then, he's visited my art room and I've visited his studio. And I can assure you, this dude is tops, y'all will love him even more than you already to. When I shot him an email just a few days ago to see if he'd be up for a Facebook LIVE session with us, he ready agreed. Because that's just the kind of awesome guy he is.
So, on Wednesday, come join the fun! Even if you are not currently reading The Growth Mindset Coach, it's okay. You are more than welcome to come hang out with us and chat with Barney. If you are a first timer to our Facebook LIVE chats, it's really simple: 1. Like/follow my page.This will ensure that my live feed appears on your Facebook feed. 2. Make sure you have a decent internet connection. Live streaming requires more bandwidth (this is what I'm told, I don't actually know what those words mean. Story of my life.) If I freeze up or don't show up, you might have a weak connection. Run down to your local Starbucks, get an overpriced latte and use their internet. For the love tho, take your headphones. Don't nobody need to hear my voice. 3. Speaking of headphones...Barney will be chatting via speaker phone which might be difficult to hear. For that reason, you might be able to better hear us with headphones. And that's it! Come with questions for our friend...he'll be ready!
Also...did you know that Barney wrote a companion book to Beautiful Oops? He sure did and you can find it here. You might not know that Barney is the author of MANY books...and songs! You can ask him all about it this Wednesday, 8pm CST.
This "officially" marks the final book club meeting but...we've only made it about 1/8th the way thru our chat! So. I've decided that we should probably continue our chat on this great book, what do you say? Love to hear your thoughts on that! I'll report back soon...until then SEE YOU WEDNESDAY NIGHT!
A little over a month ago, I got an email from Trixi Symonds over at Coloured Buttons. She asked me if I'd like to join her super fun #sewasoftie project for the month of July. Her concept was simple: introduce kiddos to stitching with a month long sharing of sewing projects via her Facebook page (which, by the way, is LOADED with fabulous sewing inspiration for kids of all ages). I happily agreed and used my recent trip to Italy (and love for all things pizza) as my inspiration.
Another reason I chose pizza is because my kiddos always find inspiration in food. Are your students/kids like that? It's so funny to me: give a kid a piece of clay and it's guaranteed that they will come back with a clay cookie, pizza or a taco. I know when I share this project with my third and fourth graders in the spring, they'll be all in.
Let's talk supplies:
* Craft Felt in bunches of colors. I find that I have a TON of craft felt. Does it multiply? Are teachers secretly dumping the stuff in my storage closet? The latter is more than likely the case. It would also explain the ziplock baggies of broken crayons I always receive (y'all, I don't even use crayons!).
* Chenille Needles are my jam. They have a big eye that is great for threading and a nice sharp point which is perfect for puncturing that felt.
* Thread can be tricky. Get the cheap stuff and it can break with a slight tug. We use embroidery floss with the single thread...not the one with 6 threads. Cuz we ain't got time to be splittin' hairs.
* Paper for creating a pattern and for making a needle threader.
* Scissors are great...and if you have one for fabric and another for paper then you are just the bee's knees.
* Pins and a Magnet to park those pins. They make these great pin wands that my students love. You just wave them and the pins snap right to the wand.
When I first got the idea to create this lesson, I kept getting more ideas. First it was allowing the kids to create toppings that can be changed at any time. Kind of like the felt boards I played with as a kid. That's why I created the segment in the video where the toppings are changed. Then I thought it would be great to introduce button sewing...for that the toppings would have to be tacked down. And, of course, I had to throw on some puffy paint because PUFFY PAINT MAKES MY WORLD GO ROUND. Thank you, Puff Daddy for the Puffy Paint. He's the one who invented it, right?
Then I got the idea for a silly-faced pizza. I spotted these giant googly eyes at the craft store and thought it would be fun. Because I wanted to add arms like we did with the Stitched Monster project, I knew I'd have to go about sewing a little differently. Originally I was going to make one video...but I decided that two was best: one for the Stuffed Pizza and Button Sewing and another for the Funny Faced Pizza.
So, just some thoughts on sewing with kids: I usually do a fibers unit in the spring, after clay. Kids love sewing, weaving, felting, you name it...and it's a great follow-up to clay as they pink-puffy-heart-with-sparkles LOVE clay. However, sewing is a challenge that you and your students need to be prepared for. Whenever we tackle something new, I remind the kids that we are learning and that takes practice and patience. I tell them that some of them will get it right away...and others will take a little longer...but we will ALL get there. With practice and patience. It's important to emphasis this so that frustration does not lead to a defeatist mentality.
Now, I'll have my students glue their items down with tacky glue. But, for those kids creating at home who wish to change the toppings of their pizza frequently, they could simply keep their cut pieces in a sealed bag.
This pizza was created the same way as the first but I really wanted to introduce button sewing. What better way to do that than with pepperoni buttons?! And, of course, puffy paint.
No doubting that I grew up in the 80's...I got puffy paint in my veins.
Shortly after posting my Stuffed Pizza video on my YouTube channel, Jeanne Kemp, an art teacher out of Baltimore shared this with me. She'd done the project with her students! How fun and they did a fabulous job. I had pizza for dinner in their honor.
This project is a little more involved simply because of the addition of sewing the arms and sewing three sides verses two. For that reason, I'll reserve this project for my older students.
I def don't plan on purchasing them all googly eyes as I don't have that kind of budget. So, more than likely, if my students decide to make a face, they'll have to create the eyes from felt. No biggie.
I really had fun creating these pizzas. They got me excited about hand sewing again...and the upcoming class I'm taking at Alabama Chanin. More on that to come. LOVE to know if any of you all have taken a class there before!
Until then, have a super fun time stitching your pizza!
True Confessions: I've lived within just two hours of the amazing Alabama Chanin and I had never ever been. If you are not familiar, let me just say that you might want to read here to get yourself super informed. But I can provide the condensed version, if you like: Alabama Chanin is the creation of Natalie Chanin a Florence, Alabama native. Florence is a rural town of about 40,000 near the Northwest corner of Alabama, lodged between Mississippi and Tennessee. For years, Natalie was a stylist and costume designer who traveled the world.
In the early 2000's, Natalie returned to her home of Florence with the intention of creating a line of hand-stitched garments. During that time, she was connected with many people who used to work in Florence during the textile boom in the 80's. Many of those folks were without employment as jobs had moved South of the border. This inspired her to create a place for people to work, create, dine, design...you name it. And that magical place is called Alabama Chanin.
I decided to give Alabama Chanin a visit after taking a road trip from Nashville to Tupelo to see my favorite friend, Mallory. Mallory runs a wonderful art program for kids that I had the pleasure of teaching one day. More on that to come. Between the drive from Nash to Tupe is Florence, right smack dap in the middle. I knew I would have to drop by and see what it was all about.
Let me just say, that when I was listening to good ole Siri for directions, I thought I was being lead astray. I found myself in an unassuming industrial park filled with nondescript metal buildings. After telling me "you have arrived" five times as I drove up and down the deserted road, I happened to look to my left and see a little read awning with the words Alabama Chanin, The Factory written on them. Really? This is it? I almost turned around. I'm so glad I did not!
The moment I walked in, two things happened. The first was that I was greeted so graciously and politely. I know what you are thinking: but of course, Southern hospitality! Lemme just say, I've lived in The South for nearly 20 years...Southern hospitality isn't as common as you'd like to think. However, in this place, I was warmly greeted and made to feel completely at home.
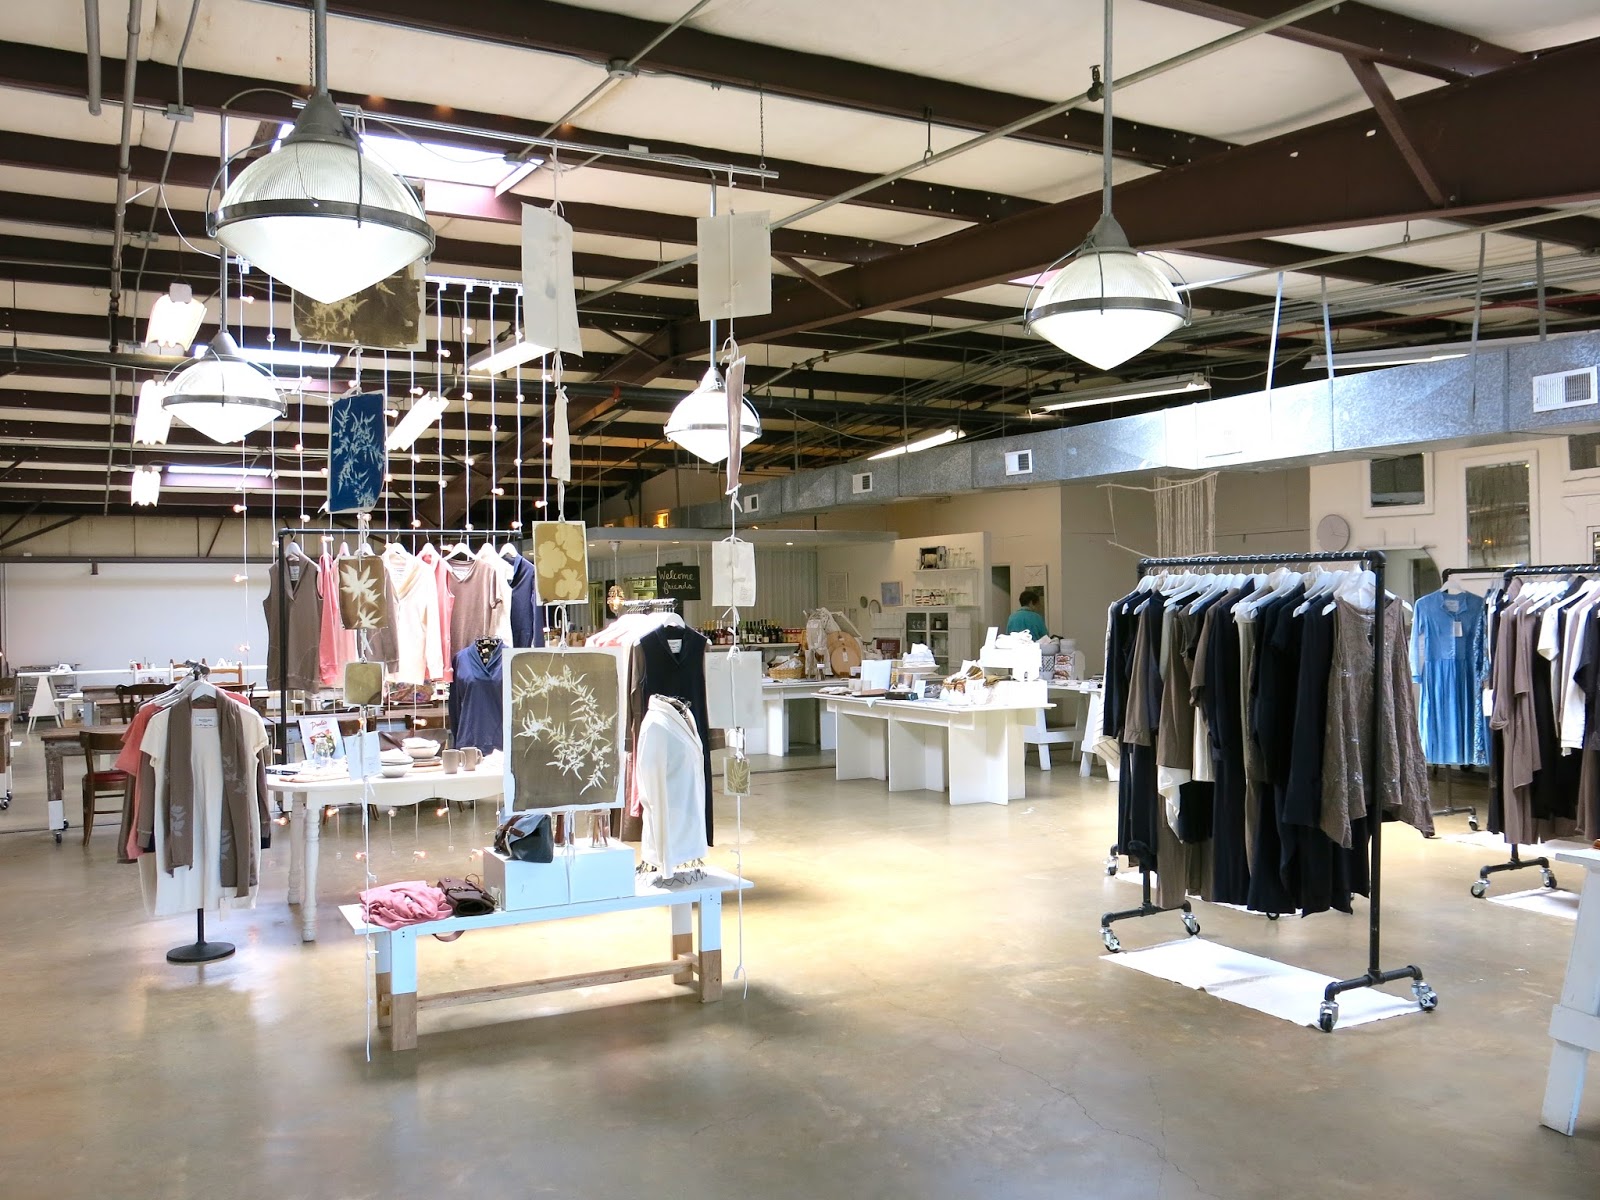
The second thing I noticed is this: the place was AMAZING. It used to house a textile factory (how appropriate, right) and looked every bit as such from the outside. But, once inside, it was like I was in Andy Warhol's The Factory meets Brooklyn-hip Heaven. The concept was an open one with the beautiful Alabama Chanin clothing on display. Just beyond that were carefully curated items such as pottery, printed dishtowels and table runners as well as cookbooks and aprons. Steps past that was a counter service restaurant with, I cannot stress this enough, The Best food I've had in a very, very long time. There was also a bridal dress area and a work station for classes. And that was just in the front room. The designing, creating and manufacturing happened just beyond the walls of the space you see in the second image.
Of course, what first drew me in: the garments.
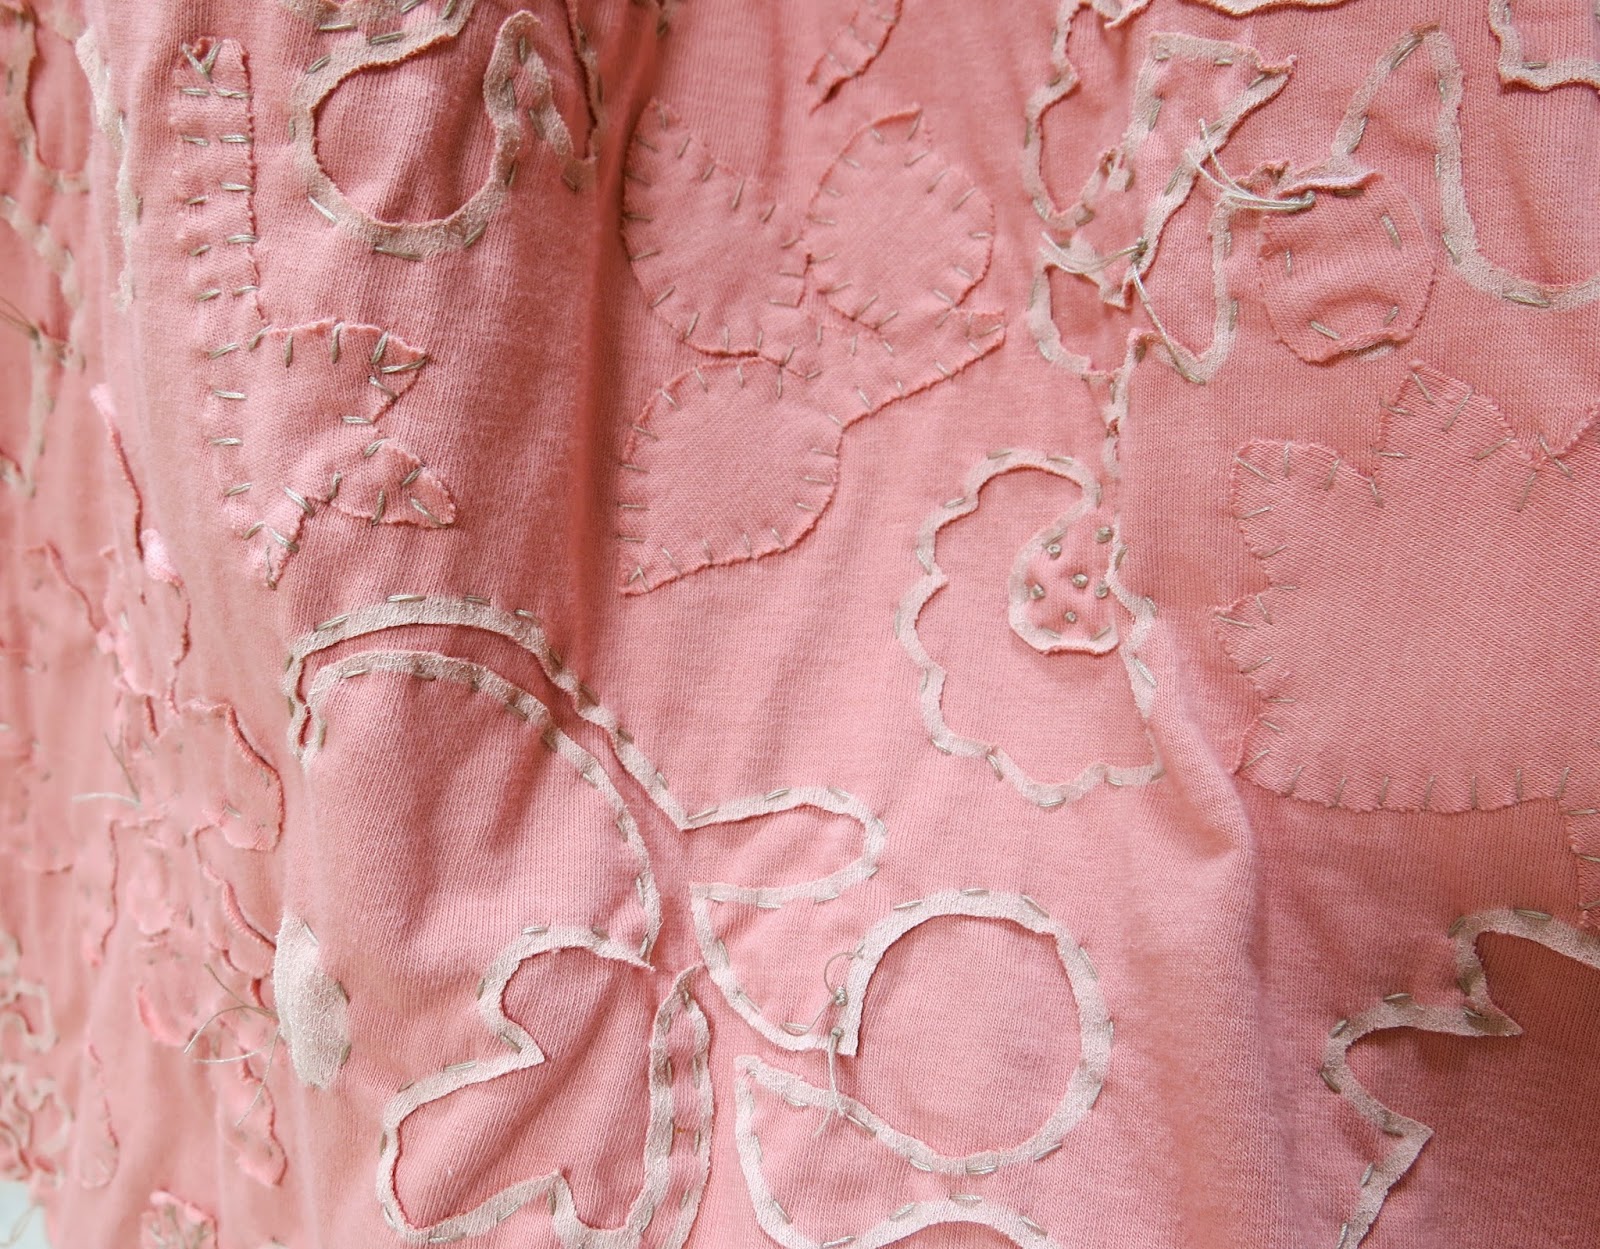
Natalie is a pioneer in the slow design movement. This is in stark contrast to the fast-fashion we know of all too well. Her garments are created from start to finish from organic cotton. They are hand-dyed with organic dyes; printed, painted and/or stamped and hand sewn.
Natalie employes those in her community. Those left without jobs when fast fashion took jobs to other places.
What that means is you are looking at a piece of clothing that was created from beginning to end, from the ground (literally) up, by hand. What that also means is Alabama Chanin clothing is anything but cheap both in quality and price.
I am not even going to lie to you, I was shocked by the prices on the pieces of clothing. We're talking into the hundreds if not a thousand or more for the bigger garments like coats.
But look. By hand, y'all. Every stitch. Every piece painted and sewn and cut away. All by hand. Each piece, a work of art.
Here's my favorite part about Alabama Chanin and Natalie: she shares her craft with all who are interested. Meaning she's not an artist who safeguards her secrets. She has her roots based in the quilt making traditions of the South. Traditions that have been lost over time. It seems her goal is to bring the teaching of those traditions back. And she starts with those in her community.
But she also reaches beyond with the many books that she has written on the tradition of her craft and the art of stitching as well.
As I was there, poking around, snapping endless photos, my stomach started to growl. It was not my intention to do anything beyond pop in for a bit before heading home but with a talking tummy and the amazing smells coming from the cafe, I decided to stay. After I placed my order at the counter, I wandered in the direction of these laughing ladies to secretly see what they were up to. I had read that every other Tuesday a sewing group met and I was intrigued by what they were creating...but I did not want to intrude on what looked to be a fine and fun party.
Immediately after snapping this photo, the women grabbed me and drew me in. A sweet woman named Judy introduced me to everyone and had them show me what they were creating.
I found that my new friend Rita, shown here with the skirt she's been working on for many a Tuesday, actually lives near me...and makes the two hour trek every other week to spend time stitching with her friends.
Isn't her piece beautiful?
This fitted corset style top is one being created for the daughter of this lovely lady. One thing I learned: never ask how long these ladies have been working on their piece. It's a labor of love...the hours spent do not count. Would you believe those sweet ladies invited me to bring my lunch over and dine with them? I had a wonderful hour of chatting, learning and watching them create.
Before leaving, I headed over to the hand stitched bridal area.
I was told that one woman had already made three trips from Maine for dress fittings. Can you imagine? That is going to be one amazing dress, y'all!
I immediately fell in love with this area.
Look at this hand stamped and stitched treasure.
In our mass produced, fast paced world, learning about slow design and seeing the beauty of it was truly inspiring.
So much so that I signed up for a class right there on the spot! I'm taking the beginner hand sewing, stamping and applique class. I'm thrilled to learn this technique and bring it back to my students. I'll be sure to share with you here as well!
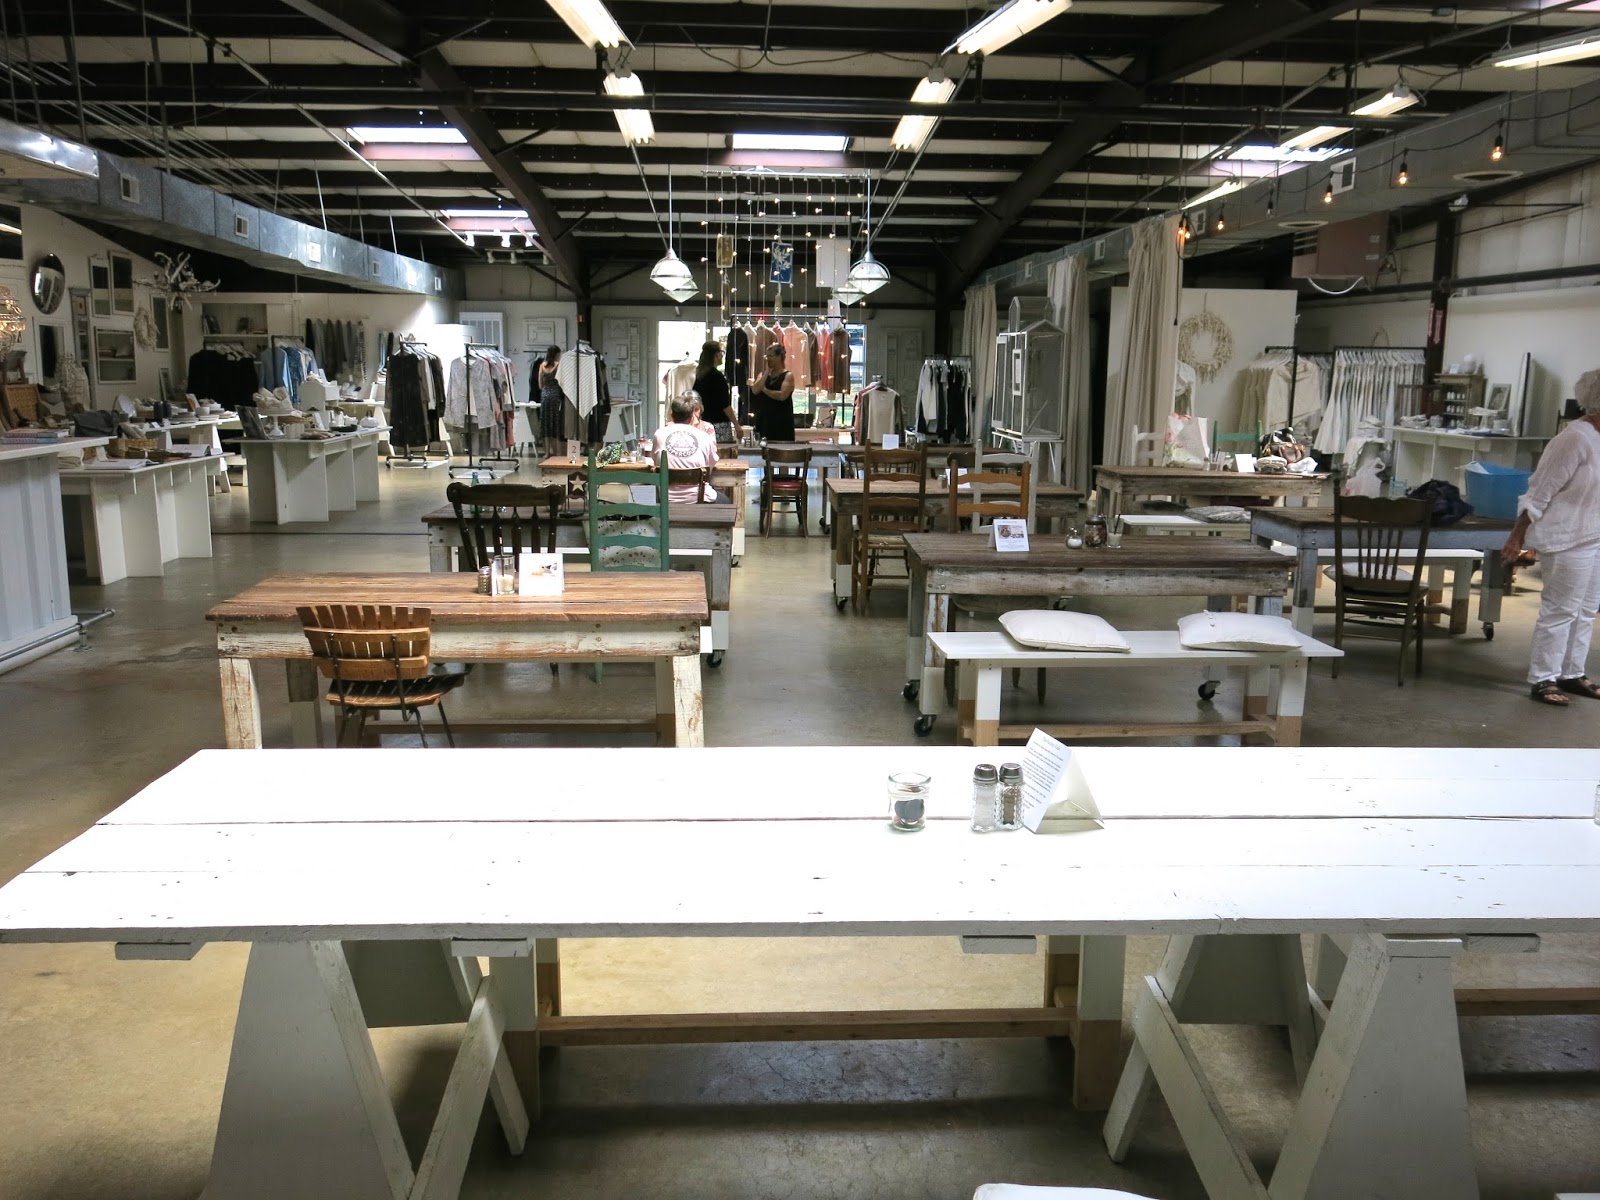
Here's a view of the left side of The Factory from the entrance.
And a view from the very back, looking over the tables in the cafe and the store front.
The food was so good that folks were coming in from outside to dine. I mean, for real. I don't even cook and I was asking if they sold a cookbook. I get a meal during my class...and I daresay that might be what I'm looking forward to the most!
Until I report back with my adventures at Alabama Chanin, I leave you with a view of this piece being worked on my one of the sweet ladies I lunched with. I am so excited to go back and learn about this beautiful technique!